Contents
- 1 Setting Up the Environment
- 2 Downloading and Running the Software
- 3 Broker Login Configuration
- 4 Updating the Instrument File
- 5 Interactive Value Adjustment using Mouse
- 6 Automated Field Population for Effortless Trading
- 7 Multiple Indices LTP with % change
- 8 Stop Loss, Target, Trailing Stop Loss, and Partial Quantity
- 9 ATM Button: Effortless Strike Selection
- 10 MTM Maximum Profit, Lock Profit and Loss
- 11 Quantity Selection Based on Your Capital
- 12 One-Click Feature – Supported Keyboard Shortcuts
- 13 Placing Orders – Market and Limit Orders
- 14 Index-Based CE/PE Trigger
- 15 Scheduled Trading: Setting Entry and Exit Times in the Tool
- 16 Executing Multiple Trades Simultaneously
- 17 Order Management: Modifying Pending Orders
- 18 Placing Stop Loss or Target Orders Directly with the Broker
- 19 Quick Trade Window
Setting Up the Environment
To ensure the seamless operation of AlgoZap UltraScalper options scalping software, it is essential to follow a series of steps to address potential issues.
Creating a Dedicated Folder
Create a folder with a name of your choice in a location of your preference. For instance, in this demonstration, a folder titled “Scalping Software” is being created on the Desktop. This designated folder is where the UltraScalper tool will be downloaded.
Configuring Windows Defender Exceptions
To prevent Windows Defender from blocking the execution of the tool—commonly observed when dealing with software downloaded from the internet without certificates—an exception needs to be added.
Follow the steps below to add an exception, using Windows 11 as an example. The process for Windows 10 should be almost same.
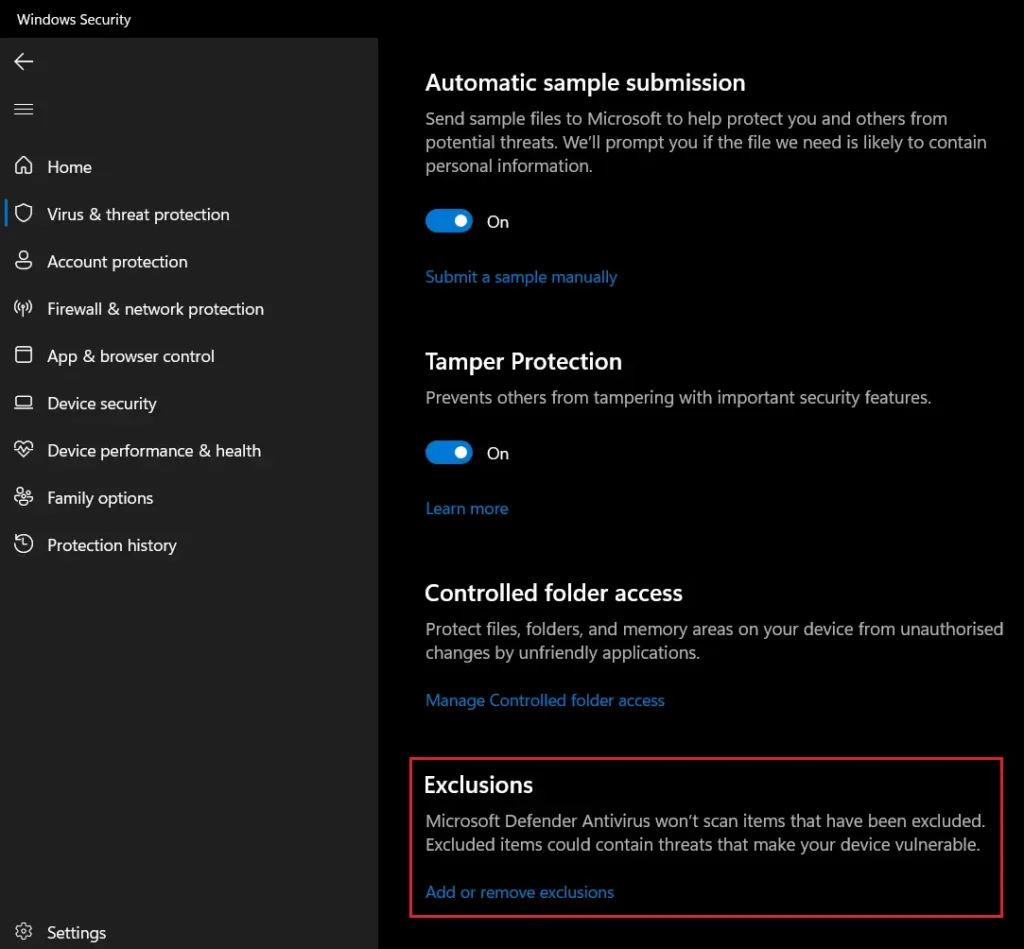
- Open Settings.
- Navigate to Privacy & security, then select Windows Security.
- Click on Virus & threat protection.
- Under Virus & threat protection settings, click Manage settings
- Select Add or remove exclusions under Exclusions and Add an exclusion for the previously created folder.
By following these instructions, you should be able to run AlgoZap UltraScalper trading software smoothly without any interference from Windows Defender.
Downloading and Running the Software
To initiate the download and installation process, follow the steps outlined below:
Downloading and Configuring the Software
- Download the software from the provided download link. A compressed zip file will get downloaded.
- Move the downloaded zip file to the folder created in the previous step. In this example, we are moving the file to the “Scalping Software” folder located on the Desktop.
- Extract the contents of the compressed zip file. This will contain configuration file (config.yml) and an executable file (exe).
Running the Software
- Open the config file and update it according to the specifications relevant to your chosen broker and save the changes.
- Run the software by right-clicking on the executable (exe) file and selecting “Run as administrator.”
Broker Login Configuration
Now, let’s see how to update the config file for specific brokers. To open the config file, right click on it and select as Open with -> Notepad. Follow the below steps specific to your broker.
Zerodha
The configuration file for Zerodha comprises two fields: “username” and “token“. Follow the steps below to update the config file for your Zerodha account:
Update Zerodha Account ID
Update the “username” field in the config file with your Zerodha account ID.
Obtain Token
- Open your preferred browser (e.g., Microsoft Edge).
- Visit the extensions store.
- Search for and install a cookie editor extension (e.g., “Cookie-Editor“).
- Log in to your Zerodha account.
- Access the Cookie Editor extension and copy the value of “enctoken“.
- Update the “token” field in the config file with the copied value.
- Save the config file and close it.
Finvasia
The configuration file for Finvasia involves six fields: “user”, “pwd”, “vc”, “apikey”, “imei”, and “TOTP”. Follow the steps below to update the config file for your Finvasia account:
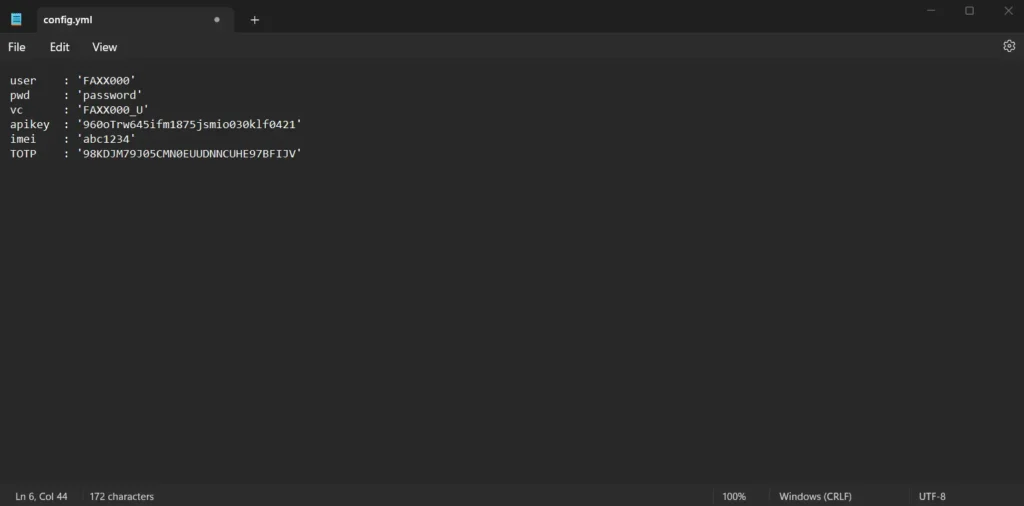
Update Finvasia Account ID and Password
Update the “user” and “pwd” fields in the config file with your Finvasia account ID and password.
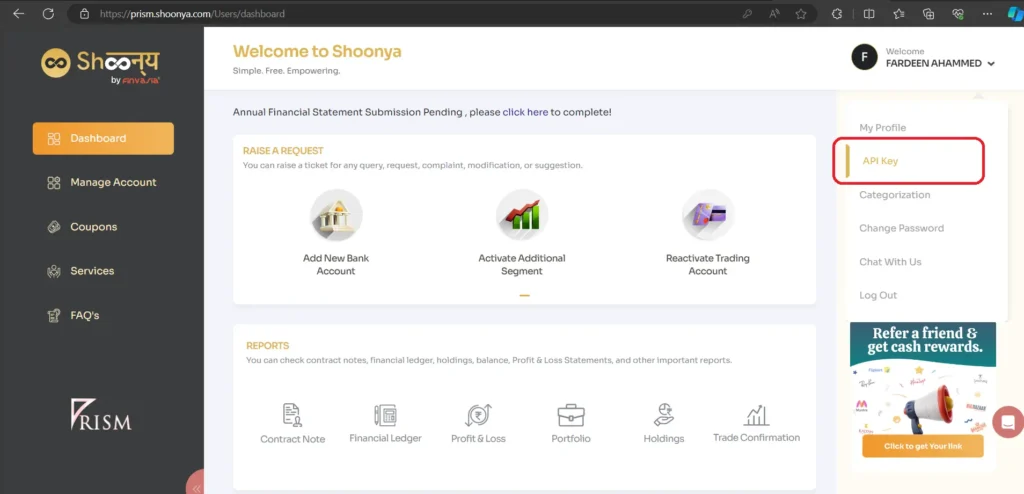
Obtain “vc”, “apikey”, and “imei” from Prism Website
- Login to the Prism website (https://prism.shoonya.com) and navigate to your profile.
- Click on the “API key” under your profile for “vc“, “apikey“, and “imei“.
- Update the corresponding fields in the config file.
Update TOTP key
- Log in to Shoonya website (https://trade.shoonya.com/#/).
- Under the profile section, expand the Security tab.
- Click on TOTP and copy the generated value.
- Update the “TOTP” field in the config file with the copied value.
- Save the config file and close it.
Updating the Instrument File
To keep the UltraScalper trading tool updated with the latest trading instruments, follow the steps outlined below:
Downloading the Latest Instrument File
Click on the download button located next to the LOGIN button to download the most recent instrument file from your broker.
Initial Setup: First-Time Tool Run
When running the tool for the first time on your system, ensure to download the latest instrument file before proceeding with the LOGIN.
Subsequent Usage: Download After 8:30 AM
For subsequent uses, download the instrument file at least once after 8:30 AM IST. It is not necessary to download the instrument file every time before LOGIN.
Interactive Value Adjustment using Mouse
In order to enhance user experience, UltraScalper incorporates a feature that allows users to modify values effortlessly using both manual input and the scroll function of the mouse.
Mouse Scroll Functionality
The software facilitates the adjustment of various parameters through the scroll wheel of the mouse. For instance, users can increase or decrease the Quantity or shift the strike UP/DOWN by simply scrolling the mouse up or down. This convenient functionality extends to all fields in the tool where manual value modification is permitted.
By leveraging this intuitive feature, users can seamlessly alter values, providing a flexible and user-friendly interaction with the trading software.
Automated Field Population for Effortless Trading
To ensure a seamless trading experience, AlgoZap UltraScalper simplifies the process with automatic field population.
When you select an index, the tool automatically populates the Exchange, Expiry, and Quantity fields. The default lot size is set to 1, but you can easily adjust this value according to your preferences.
Multiple Indices LTP with % change
The AlgoZap UltraScalper provides real-time information on multiple indices.
At the top of the tool, you will find the Last Traded Price (LTP) and the percentage change from the previous day’s close for indices such as Nifty, Banknifty, and Finnifty. You can also select other indices like Sensex, Midcapnifty, or Bankex from the dropdown menu.
Stop Loss, Target, Trailing Stop Loss, and Partial Quantity
Index Stop Loss
To set the index stop loss, enter a value in the “Index SL” field. This value represents the exact index price at which your position will be exited.
For example, if BankNifty is trading at 45000 and you’re entering a Call (CE) long position or Put (PE) sell position, setting the index stop loss at 44950 will trigger the exit if the index falls below this value.
Index Target 1, Index Target 2, and Partial Quantity
To enable these features, input values in the “Index TGT1”, “Index TGT2”, and “Partial Qty” fields.
Index Target 2 is only activated if a Partial Quantity is provided. Otherwise, the entire position will be squared off at Index Target 1.
For instance, consider BankNifty trading at 45000. Let’s say I’m entering a Buy position with 4 lots of Call (CE). I can set Index Target 1 at 45100, Index Target 2 at 45150, and a partial quantity of 1 lot. If the index price crosses 45100, 3 lots of my position will be squared off, and the remaining 1 lot will be closed at 45150. The same principle applies for Put (PE) sell positions.
Now, if I’m entering a Buy position with 5 lots of Put (PE), I will input Index Target 1 as 44900, Index Target 2 as 44800, and a partial quantity of 3 lots. If the index price falls below 44900, 2 lots of the PE position will be squared off. If the index falls below 44800, the remaining 3 lots will be closed.
In cases where I provide both Index Target 1 and Index Target 2 but do not specify any partial quantity, or if I provide Index Target 1 with a partial quantity but omit Index Target 2, the tool will exit the entire position at Index Target 1.
Index Trailing Stop Loss
For Index Trailing Stop Loss, input a value in the “Index TSL” field. This feature is active only when an Index Stop Loss is provided.
Consider BankNifty trading at 45000. Suppose I initiate a Call (CE) Buy position with an index stop loss set at 44900, coupled with an Index Trailing Stop Loss of 50. This implies that for every 50-point increase in BankNifty, my Index stop loss will be adjusted upward by 50 points. For instance, if BankNifty reaches 45050, my Index stop loss will be updated to 44950. Similarly, if BankNifty advances to 45100, my Index stop loss will be updated to 45000.
Option Stop Loss
To set the option stop loss, input a value in the “SL” field. Specify the stop loss value in points.
Example: If buying an option at 100 with a stop loss at 95, set Option Stop Loss at 5.
Option Target 1, Option Target 2, and Partial Quantity
To enable these features, input values in the “TGT1”, “TGT2”, and “Partial Qty” fields. Target 2 is only activated if a Partial Quantity is provided.
Option Trailing Stop Loss
For Option Trailing Stop Loss, input a value in the “TSL” field. This feature is active only when an Option Stop Loss is provided.
Consider this scenario: I am purchasing a 45000 Call (CE) option at a price of 100, setting a stop loss at 95, and a Trailing Stop Loss of 5. This signifies that for every 5-point rise in the price of the 45000 CE option, my stop loss will be adjusted upward by 5 points. For instance, if the 45000 CE option reaches 105, my stop loss will be increased to 100. Similarly, if the price of the 45000 CE option rises to 110, my stop loss will be updated to 105.
ATM Button: Effortless Strike Selection
In options trading, choosing the correct strike prices promptly is vital. The AlgoZap UltraScalper streamlines this task by introducing an ‘ATM (At the Money)’ button. With a simple click, you can efficiently select the At the Money Call (CE) and Put (PE) strikes.
Automated Strike Selection
Example: With a single click, choose At the Money Call (CE) and Put (PE) strikes based on the current index price. Additionally, you have the flexibility to specify the number of strikes away from the ATM strike that you wish to view.
Manual Strike Entry
You can also manually enter the strike price if needed. Input strike value next to CE or PE fields and press Enter. You can also shift the strike UP/DOWN by scrolling mouse wheel.
MTM Maximum Profit, Lock Profit and Loss
The AlgoZap UltraScalper provides users with the capability to set account level profit, lock profit and loss. By configuring these settings, users can ensure automated position closure when the MTM value aligns with the specified limits.
Configuration
To utilize this feature, users can input input a positive value in the ‘Max. Profit’ box for maximum profit and negative value in the ‘Max. Loss’ box for maximum loss or positive value in the ‘Max. Loss’ box for lock profit and enable the checkbox. Upon activating the MTM Target, Lock Profit and Stop Loss feature, the tool will systematically execute position closures as soon as the Marked-to-Market value reaches the designated thresholds.
Risk Management
By utilizing the MTM maximum Profit, Lock Profit and Loss feature, users can stay within their specified profit and loss limits, fostering a disciplined and controlled trading approach.
Quantity Selection Based on Your Capital
The AlgoZap UltraScalper offers a convenient feature for automatically determining the total lots you can purchase based on your available capital.
Input the desired percentage of your total capital next to “Capital %,” and use the “B” or “S” buttons to calculate the number of lots you can BUY/SELL based on your available capital.
Please not that the number of lots displayed will not be 100% accurate as the lot size is calculated for market order. But, we never use market order. Instead we use limit order with 5% price buffer.
One-Click Feature – Supported Keyboard Shortcuts
The AlgoZap UltraScalper introduces a one-click feature designed for quick and efficient actions through the use of keyboard shortcuts. To activate this feature, simply toggle the switch next to “1Click.” Below are the list of supported keyboard shortcuts.
Supported Keyboard Shortcuts
- ↑ (Up Arrow): Buy CE
- ← (Left Arrow): Sell CE
- ↓ (Down Arrow): Buy PE
- → (Right Arrow): Sell PE
- C (Capslock C): Cancel All Orders
- E (Capslock E): Exit Selected Position
- X (Capslock X): Close All Positions
- K (Capslock K): Power Kill
Once the 1Click feature is enabled, you can seamlessly employ the keyboard shortcuts in the QuickTrade window. Ensure that the QuickTrade window is open after enabling 1Click for optimal functionality.
Placing Orders – Market and Limit Orders
This section guides you on placing Market and Limit orders effortlessly using the AlgoZap UltraScalper tool. Whether you prefer buying at the current market price or setting a specific limit, the tool provides you with the flexibility to execute your trades seamlessly.
Market Order
To place a Market Order, Select “MKT” from the drop-down menu. By default, the tool places a Limit order with a 5% market protection.
Limit Order
For placing a Limit Order, Select “LMT” from the drop-down menu. Input the desired buy price under the Price column. The Price under the Limit column is 0 by default.
Limit Order Scenarios
Consider two scenarios for a Limit Order:
Scenario 1:
- If you want to Buy Call (CE) at 90 (assuming the Last Traded Price – LTP – is 100), a Limit order will be placed since your buy price is less than LTP.
Scenario 2:
- If you want to Buy Call (CE) at 110, and your buy price is greater than LTP, an SL-Limit order will be placed. For instance, if you input 110 under Price and 2 under Limit, the SL-Limit order will have a price of 112 and a Trigger price of 110.
Index-Based CE/PE Trigger
The AlgoZap UltraScalper provides a feature enabling you to trigger Call (CE) or Put (PE) trades based on predefined index levels. This functionality allows you to set specific conditions for buying or selling options, either through a limit order or a market order, once the index reaches a specified level.
Setting Up Index-Based Trigger
To utilize the Index-Based CE/PE Trigger, follow these steps:
- Input the desired index level in the “Index Level” field.
- Choose whether to set a limit order or a market order for your CE or PE trade.
Canceling Index-Based Entry
To cancel an index-based entry, locate the “X” button next to the index entry and press it to terminate the triggering condition.
Scheduled Trading: Setting Entry and Exit Times in the Tool
The AlgoZap UltraScalper offers a Scheduled Trading feature, allowing you to predefine entry and exit times for automated trade execution. By configuring the desired time in the ‘hours:minutes:seconds’ format and activating the entry and exit time switch, the tool streamlines your trading activities.
Setting Entry and Exit Times
To utilize Scheduled Trading, follow these steps:
- Input your preferred time in the ‘hours:minutes:seconds’ format.
- Activate the entry and exit time switch to enable automated trade execution at the specified times.
The tool, once configured, will automatically execute your trades according to the specified entry and exit times.
Executing Multiple Trades Simultaneously
The AlgoZap UltraScalper enables you to execute multiple trades at the same time. You can choose to buy or sell CE/PE options and click the ‘TRADE’ button. The tool will execute both trades simultaneously based on the input values.
Order Management: Modifying Pending Orders
In the AlgoZap UltraScalper, you have the ability to modify your open orders, allowing for greater flexibility.
Modifying Order Price
You can adjust the price of your open order effortlessly by following these steps:
- Increase or Decrease Price:
- Click the +/- button by selecting the price cell of the order whose price you wish to modify.
- By default, the tool increments the price by 0.1. However, you can customize this increment value by entering a value in the Buffer cell located next to the orders table.
- For instance, entering ‘2’ in the buffer field and pressing the + button will increase your order price by 2.
- Direct Price Modification:
- Alternatively, if you prefer to directly change the price of your order, simply input the desired price in the Entry field and press the ENTER button. Your order price will be updated accordingly.
Canceling Pending Orders
To cancel a pending order, select the respective order and press the CANCEL button.
Converting Pending Order to Market Order
You can convert a pending order to a market order by selecting the order you wish to convert to a market order and press the MARKET button.
Placing Stop Loss or Target Orders Directly with the Broker
The AlgoZap UltraScalper offers option to place stop loss or target orders directly with your broker.
Activation
To utilize this feature, follow these steps:
Enable Stop Loss or Target First:
- Toggle the switch for either “SL First” or “Target First” based on your preference.
Input Values:
- Input the respective values for stop loss or target in the SL or Target 1 fields.
Order Placement:
- Once the necessary values are set, proceed to place your order.
Quick Trade Window
The Quick Trade window is designed to provide essential trade placement elements in a compact format, optimizing screen space utilization. Quick Trade window can sit atop charts or other windows and allow for the contents beneath the Quick Trade window to be seen. This allows for quick and efficient trade monitoring and execution.
It’s important to note that the values in the Quick Trade window correspond to those set in the main window. Ensure all required values are properly configured in the main window before opening the Quick Trade window.
Keyboard Shortcuts
Keyboard shortcuts can be utilized within the Quick Trade window for efficient trading. Please ensure the “1 Click” switch is enabled in the main window before opening the Quick Trade window if you intend to utilize keyboard shortcuts.